Have you ever wondered how a mushroom actually grows? Where does it come from? What is happening inside that bag of substrate before you see anything?
Understanding the mushroom life cycle is not just for scientists. It is one of the most useful things a mushroom farmer can know, because when you understand what is happening at each stage, you make better decisions, catch problems earlier, and get better harvests.
This guide explains the full mushroom life cycle in simple language, with examples any beginner can follow. No complicated science. No confusing terms without explanations. Just a clear picture of how mushrooms go from nothing to harvest.
What Is the Mushroom Life Cycle?
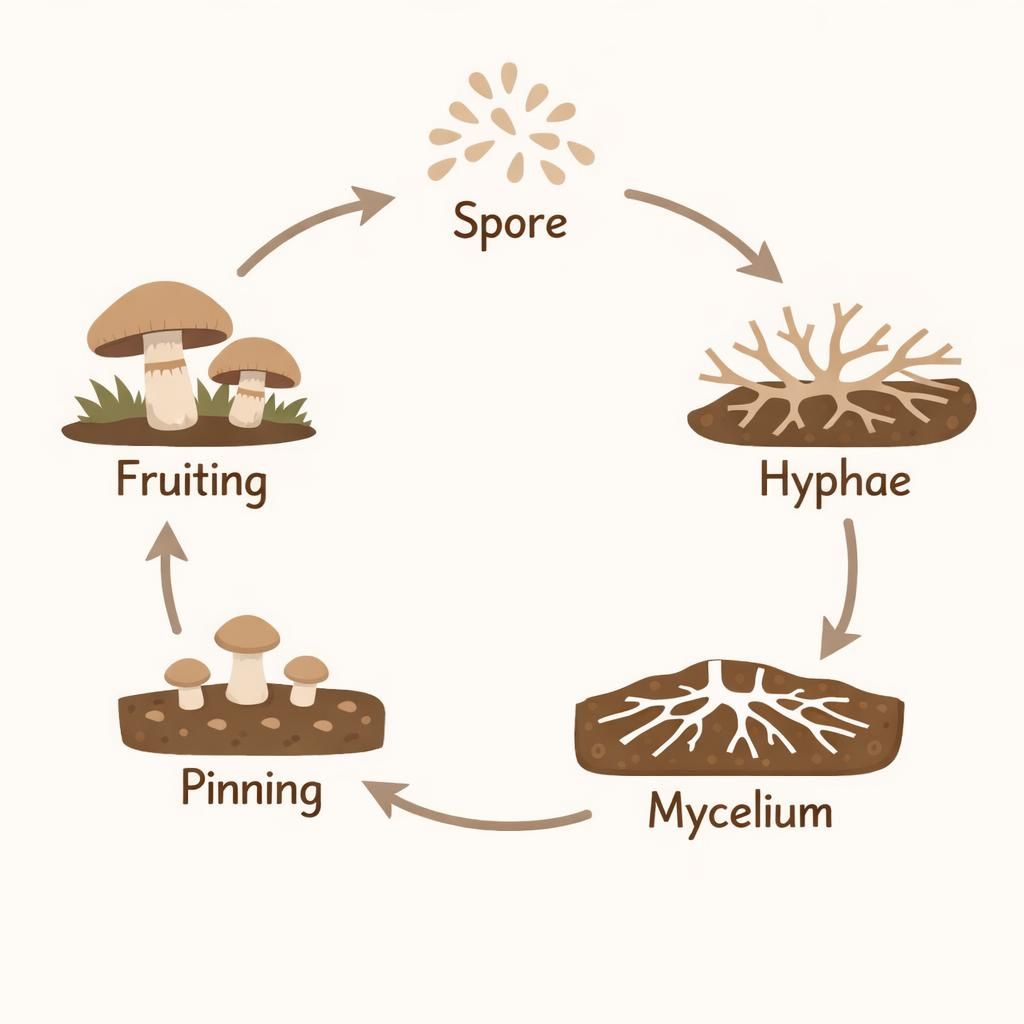
The mushroom life cycle is the complete process by which a mushroom is born, grows, reproduces, and starts the cycle again. It begins with a microscopic spore, which germinates into mycelium (the underground root-like network), then produces mushroom pins that grow into full fruiting bodies. Mature mushrooms release spores and the cycle begins again.
What Are the Stages of Mushroom Growth?
The main stages of mushroom growth are: spore release, germination, mycelium growth, pinning (primordia formation), fruiting body development, and spore dispersal. For farmers, the practical stages are: substrate preparation, inoculation, incubation (colonization), pinning, fruiting, and harvest. Most oyster mushrooms complete the full cycle from inoculation to first harvest in 3 to 4 weeks.
Here is a simple overview before we go deeper into each stage:
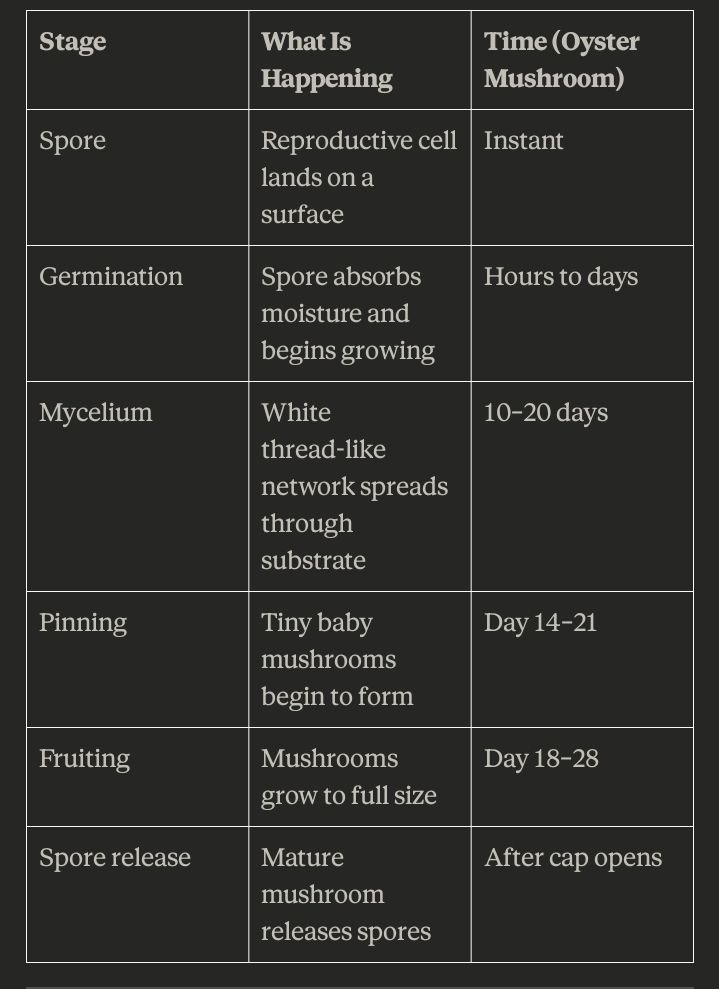
Stage 1: Spore (Where Mushroom Life Begins)
Every mushroom starts as a spore. A spore is the mushroom’s equivalent of a seed, but much, much smaller. You cannot see a single spore with your naked eye. Mushrooms release millions of them at a time.
Spores are produced inside the gills or pores on the underside of a mushroom cap. When the mushroom matures, it releases these spores into the surrounding air.
From there, spores travel by:
- Wind (the most common way)
- Water and rain
- Insects and animals moving through or past the mushroom
A single mature oyster mushroom can release millions of spores in one day. Most of them land in unsuitable places and never develop. But the ones that land on moist, nutrient-rich surfaces have a chance to start the cycle.
What this means for farmers: When you see a mature mushroom with a fully flat, open cap releasing white dust, that is spores dropping. This is a sign you have waited too long to harvest. Harvest before the cap fully opens for better shelf life and quality.
Stage 2: Germination (The Spore Starts to Wake Up)
When a spore lands somewhere with the right conditions; moisture, warmth, and nutrients, it begins to germinate.
Think of it like a seed in soil. When a seed gets water, it swells and starts sprouting. A spore does something similar. It absorbs moisture from its environment, its outer coat splits open, and tiny thread-like structures start growing out of it.
These threads are called hyphae (pronounced: hy-fee). They are thinner than a human hair and invisible to the naked eye.
The hyphae grow outward in all directions, searching for food. This is the mushroom beginning to feed and prepare to grow.
Simple comparison: Think of the hyphae like fingers reaching out through the soil looking for nutrients. Where there is food, they grow. Where there is nothing, they stop.
Germination happens quickly, within hours or a few days, if conditions are right. Too dry, too cold, or no nutrients available, and the spore simply dies without germinating.
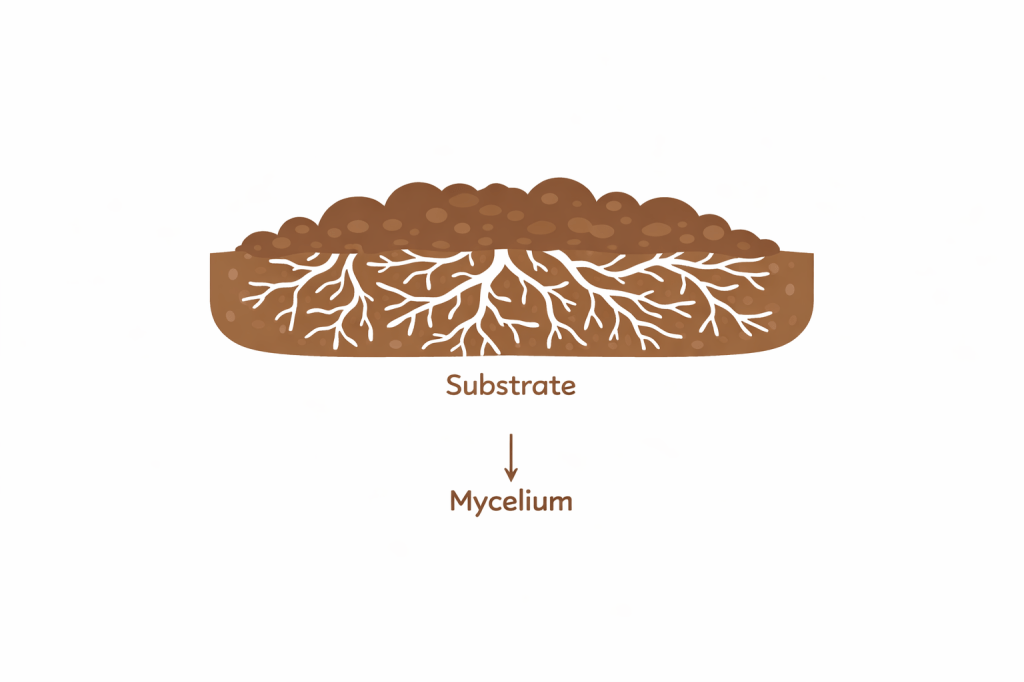
Stage 3: Mycelium (The Hidden Network)
As hyphae grow and branch out from multiple spores, they begin to connect and form a dense network. This network is called mycelium.
Mycelium is the main body of the mushroom, even though most people only think of the cap and stem as “the mushroom.” The actual living organism is the mycelium, which lives inside the substrate (straw, sawdust, wood, or soil), hidden from view.
Here is the easiest way to picture it: if a mushroom is like an apple on a tree, then the mycelium is the tree itself. The fruiting body (the mushroom you see and eat) is just the reproductive part, like the fruit. The real organism is underground, spreading through its food source.
Mycelium looks white and fluffy, almost like cotton wool. In your growing bags, it appears as bright white threads spreading through the substrate. When the bag has turned completely white, it is fully colonised and ready to fruit.
What mycelium does:
- Breaks down the substrate and absorbs nutrients
- Stores energy for mushroom production
- Fights off some competing organisms
- Signals when conditions are right to start forming mushrooms
For farmers: Healthy mycelium is white and slightly cottony. If you see green, black, or pink colours in your bags, that is contamination, something else is growing in your substrate. This usually means the substrate was not pasteurized properly. For a full explanation of how to prevent this, read our guide on how to pasteurize mushroom substrates.
Stage 4: Pinning (Mushrooms Start Forming)
Pinning is one of the most exciting moments in mushroom farming. It is when tiny baby mushrooms called pins or primordia first appear.
Pins look like small, round bumps or dots on the surface of the mycelium. They are usually the size of a pinhead when they first form, hence the name.
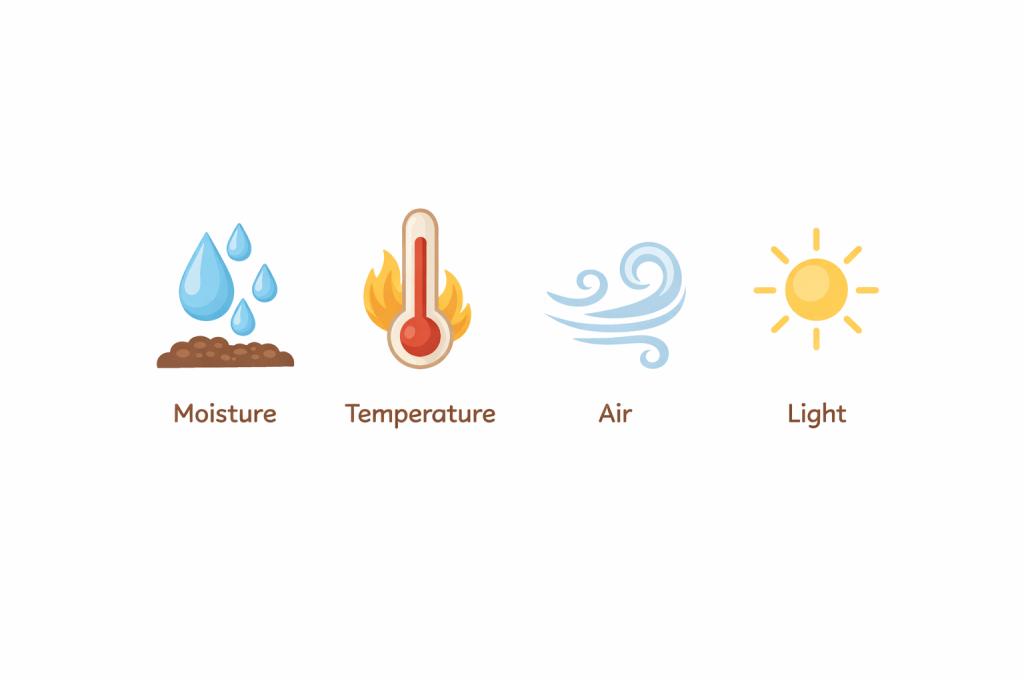
What triggers pinning? The mycelium needs a signal that conditions outside the substrate are right for producing mushrooms. That signal usually comes from:
– Fresh air. When you open or cut the bags, carbon dioxide drops and oxygen levels rise. This tells the mycelium it is time to produce mushrooms.
– A drop in temperature. A slight drop in temperature (2–5°C below incubation temperature) mimics the natural change from day to night in nature.
– Increased humidity. Misting the bags and growing space raises moisture in the air, which triggers pin formation.
– Light. Mushrooms do not use light for energy the way plants do, but they do use light to orient the direction of growth. Some indirect light helps pins form properly shaped mushrooms.
Pins appear roughly 3 to 7 days after you open your bags and change the conditions. They grow quickly, you can see visible growth from one day to the next.
For farmers: Do not open bags during incubation. Opening too early drops the temperature and humidity too soon before the mycelium is ready, reducing your yield. Wait until you see full white colonisation before triggering fruiting conditions.
Stage 5: Fruiting (The Mushroom Grows Fully)
Once pins have formed, they grow into full mushrooms; the fruiting body stage. This is the part you eat.
The mushroom develops its familiar shape: a stem, a cap, and (for many species) gills or pores underneath the cap. Growth at this stage is rapid. Under good conditions, oyster mushrooms go from visible pins to harvest size in 3 to 7 days.
What determines how well this stage goes:
Humidity. Mushrooms are made up of 80–90% water. If the air around them is too dry, they will develop slowly, crack, or produce very small caps. Keep humidity above 85% during fruiting by misting your bags and the walls of your growing space several times a day.
Airflow. Mushrooms need oxygen to grow and release carbon dioxide as they do. Without fresh air exchange, CO₂ builds up. The result is long, thin, weak stems and very small caps, called “leggy” growth. Keep air moving through your growing space, but avoid pointing a fan directly at the mushrooms, which dries them out.
Temperature. For oyster mushrooms, 20–28°C is the right fruiting range. Too hot and growth slows. Too cold and pins stop forming. In very hot climates like Nigeria’s dry season, grow at night or early morning, or use shade and water evaporation to cool the grow space.
How Do Mushrooms Reproduce?
Mushrooms reproduce by releasing spores from their gills or pores once the fruiting body matures. Spores are microscopic cells, each one capable of starting a new mushroom cycle if it lands on a suitable surface. One mushroom releases millions of spores, but only a tiny fraction find the right conditions to germinate. In farming, growers skip this stage by using spawn instead.
In nature, reproduction depends on spores finding the right environment by chance. In mushroom farming, growers skip the uncertainty of spore germination by using spawn substrate that already contains actively growing mycelium. This shortcut is why farmed mushrooms grow reliably and predictably, rather than depending on luck.
How Long Does It Take for Mushrooms to Grow?
The time from inoculation (adding spawn to substrate) to first harvest depends on the mushroom variety. Oyster mushrooms take 3 to 4 weeks. Button mushrooms take 6 to 8 weeks. Shiitake mushrooms take 6 to 12 weeks. After the first harvest, the same substrate produces a second and third flush of mushrooms, each taking 1 to 2 weeks of rest between harvests.
Mushroom Type. Inoculation to First Harvest. Flushes per Batch
Oyster mushroom: 3–4 weeks. 2–3 flushes
Button mushroom: 6–8 weeks. Multiple
Shiitake mushroom: 6–12 weeks. Multiple, over years.
Why Understanding the Mushroom Life Cycle Matters for Farmers
Every practical decision in mushroom farming connects to one of the life cycle stages.
Better yields come from supporting each stage correctly. Giving the mycelium the right temperature during incubation, then triggering fruiting with fresh air and humidity at the right time, produces more pins per bag and bigger mushrooms per flush.
Avoiding mistakes becomes easier. When you know what is supposed to be happening inside your bags, you can spot problems early. Slow colonization might mean your spawn was weak or your substrate too wet. No pins after opening might mean the humidity is too low or the room is too warm.
Timing your harvest correctly. The fruiting stage ends when the cap opens fully and spores begin to drop. At that point, shelf life drops fast and quality declines. Knowing that the cap should still be slightly cupped when you harvest means you pick at the right moment, every time.
For a complete guide on growing from substrate preparation through to first harvest, read our Mushroom Farming in Africa: Complete Beginner Guide (Step-by-step)
Common Mistakes Beginners Make
Harvesting too early. Small pins look tempting but they are not ready. Oyster mushrooms are best harvested when the cap is 5–10cm wide and still slightly cupped inward. If you harvest too small, you get less weight and lower income per bag.
Harvesting too late. Leaving mushrooms until the cap is flat and dropping white dust (spores) means you have missed the best quality window. The mushrooms are still edible, but shelf life is much shorter.
Poor humidity during fruiting. Many beginners mist once a day and wonder why their mushrooms are thin and cracked. Mushrooms need high humidity consistently, mist two to three times daily, or more in dry climates.
Opening bags too early during incubation. Checking on bags too often, opening them before colonization is complete, introduces contamination and disrupts the mycelium. Wait for full white coverage before changing the environment.
Confusing contamination with mycelium. Healthy mycelium is bright white and slightly fluffy. Contamination is green, black, pink, or yellow. If you see any of these colours, remove that bag from your grow room immediately before it spreads.
Frequently Asked Questions
Do mushrooms grow from seeds?
No. Mushrooms do not produce seeds. They reproduce through spores; microscopic cells released from the gills or pores of a mature mushroom cap. Spores serve a similar function to seeds (starting a new organism) but are far simpler in structure. In mushroom farming, growers use spawn; pre-grown mycelium, instead of spores, because it is faster and more reliable.
What is mycelium?
Mycelium is the main living body of a fungus; a dense network of white, thread-like structures that grow through the substrate (straw, sawdust, or wood). The mushrooms you eat are just the fruiting bodies; the reproductive part. The actual organism is the mycelium, which lives inside the growing material and can survive long after the mushrooms have been harvested.
Can mushrooms grow without spores?
In nature, no; spores are how mushrooms start a new cycle. In farming, yes. Farmers use spawn, which is substrate already colonized with mycelium, skipping the spore germination stage entirely. This is why farmed mushrooms grow predictably and quickly, rather than depending on a spore landing in exactly the right place with the right conditions.
How do mushrooms spread?
In nature, mushrooms spread by releasing millions of spores into the air. Wind carries most of them. Water, insects, and animals also transport spores to new locations. In farming, spread is controlled, mycelium is mixed evenly through prepared substrate so it colonises consistently rather than spreading by chance.
Conclusion
The mushroom life cycle; from spore to mycelium to fruiting body and back to spore, is one of nature’s most efficient and elegant systems. For a farmer, understanding it is practical knowledge, not just interesting biology.
Know what your mushrooms are doing at each stage. Give them what they need at the right time. Harvest at the right moment. The result is better yields, fewer failed batches, and a mushroom business that keeps improving with every cycle.
When you are ready to turn this knowledge into a working farm, start with our Mushroom Farming in Africa: Complete Beginner Guide And if you want to understand what to do with your harvest beyond fresh sales, our guide on Mushroom Value Addition covers powder, honey blends, and food products that extend your income well beyond harvest day.

Leave a comment