
Mushroom spawn is the starting point for every successful batch of mushrooms. Get your spawn right and the rest of the process becomes much easier. Get it wrong, or use poor-quality spawn and you will struggle to understand why your bags keep failing, even when everything else looks correct.
This guide covers three things most spawn articles skip: how to make grain spawn step by step, how to identify good spawn from bad, and how to handle the sourcing and import challenges specific to mushroom farming in Africa.
If you are still learning how mushrooms grow before the spawn even enters the picture, read our Mushroom lifecycle guide it explains what mycelium is and what it does inside the substrate before any mushrooms appear.
What Is Mushroom Grain Spawn?
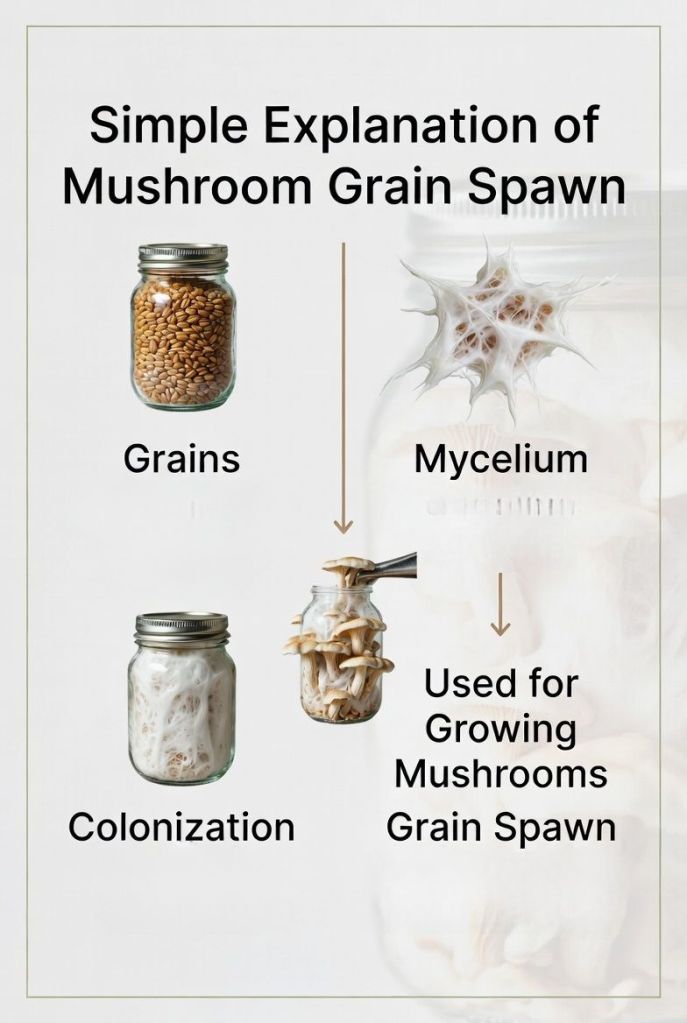
Mushroom grain spawn is grain; typically sorghum, millet, maize, or wheat that has been sterilized and then colonized by mushroom mycelium. It acts as the “seed” used to start mushroom growth in a new substrate. When grain spawn is mixed into pasteurized straw or sawdust, the mycelium spreads from the grain into the substrate and eventually produces mushrooms.
Grain spawn works better than other spawn types for most beginners because it distributes evenly through the substrate, colonizes quickly, and produces a strong, fast start. The individual grains act as separate colonization points, the more grains spread through your substrate, the faster the mycelium fills the bag.
Why Grain Spawn Quality Matters (Often Ignored)
Many beginners buy spawn without understanding what healthy spawn looks like. This is one of the most common reasons early batches fail.
Contaminated spawn poisons your entire batch. When you mix spawn into substrate, you are also mixing in whatever organisms are living in that spawn. Contaminated spawn introduces competing molds and bacteria directly into your carefully prepared substrate and no amount of good technique can fix that.
Weak or aging spawn colonizes slowly. Spawn past its prime still looks white but has lost its vigorous growth energy. It colonizes the substrate slowly, which gives competing organisms more time to establish themselves. The result looks like contamination but started with weak spawn.
The cost of bad spawn is not just the spawn itself. It is the substrate you prepared, the bags you packed, the time you waited, and the income you did not earn. One batch of bad spawn in a 100-bag grow cycle wastes significantly more money than the spawn cost.
How to Identify Good Quality Mushroom Spawn
This section may be the most important in the entire guide. Knowing what to look for before you use or buy spawn saves more failed batches than any other single skill.
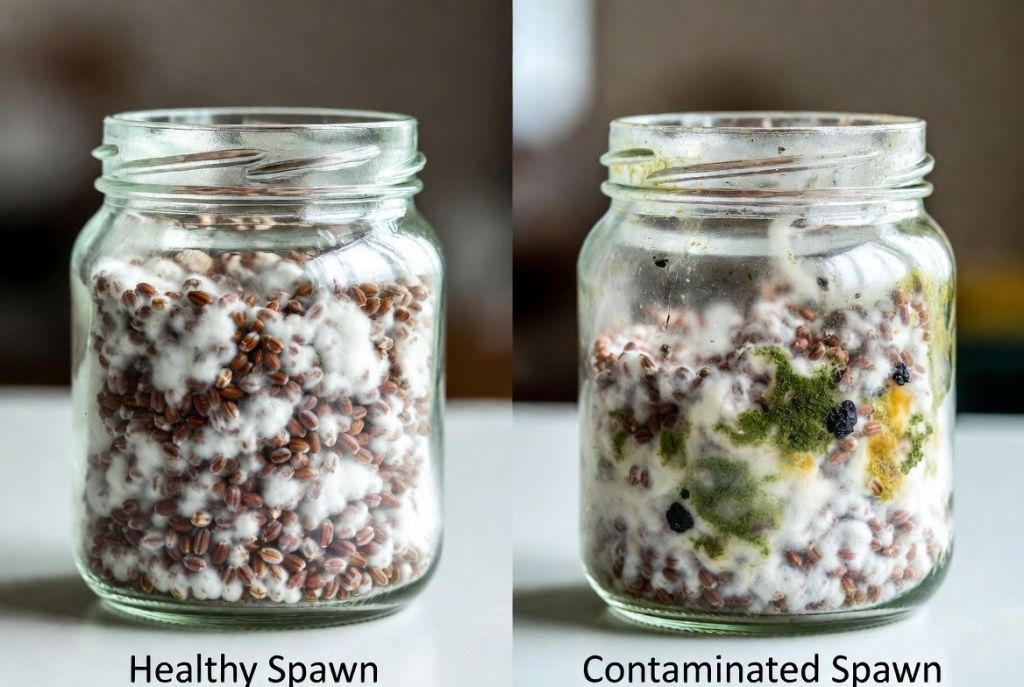
Signs of Good Spawn
Bright, uniform white growth. Healthy mycelium is clean, bright white, slightly fluffy, and evenly distributed across and through the grain. When you look through the bag, the white growth should be consistent from top to bottom, not patchy or thin in some areas.
Firm grain structure. The individual grains should still hold their shape. They should not have broken down into mush or clumped into a solid, inseparable mass. Good spawn pours freely when the bag is opened, and the grains separate with a gentle shake.
Fresh, neutral smell. Healthy grain spawn smells clean and slightly earthy, a bit like fresh mushrooms or damp soil. No sourness. No ammonia. No foul odour of any kind.
No visible colour other than white. No green. No black. No yellow. No pink. No blue. No grey patches. Any colour other than white inside a spawn bag is a red flag, do not use it.
Correct age. Fresh spawn that has been colonized within the last 2–4 weeks and stored at the right temperature performs best. Ask your supplier when the spawn was made and how it has been stored.
Signs of Bad or Contaminated Spawn
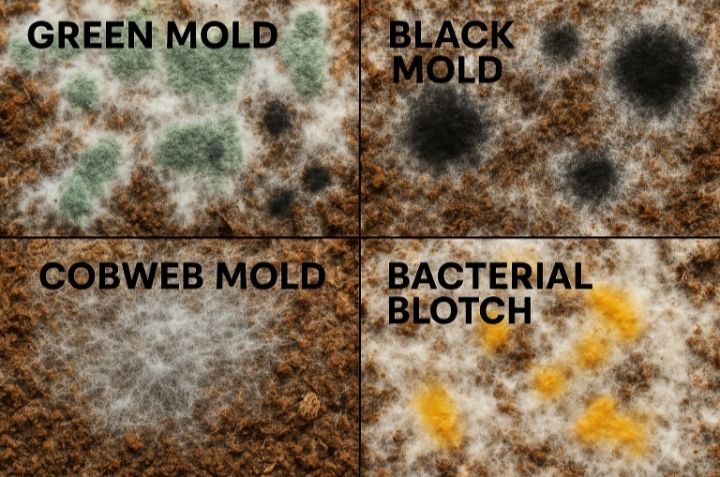
Green, black, or yellow patches. These are the colours of contaminating molds, most commonly Trichoderma (green), bacteria (yellow or slimy), or other competing fungi (black). Any of these colours disqualifies the spawn immediately.
Sour, ammonia, or foul smell. A sour smell indicates bacterial contamination. An ammonia smell means the grain fermented during soaking or storage. A musty smell that is not mushroom-like indicates competing fungi. Trust your nose.
Slimy texture. If you open the bag and the grain feels wet and slimy rather than moist and firm, bacterial contamination is almost certainly present. Discard it.
Dry, powdery, or crumbling grain. Grain that has dried out completely means the mycelium has died, likely from heat damage or storage without adequate moisture. The spawn may still look white but will not colonize.
Solid, inseparable mass. If the bag has compressed into one solid block that will not break apart with gentle pressure, the spawn has over-colonized and begun to age past its usable peak. It may still work but performance will be reduced.
Why Imported Spawn Often Fails
This is a real and practical problem that very few mushroom farming guides address honestly.
Spawn imported from Europe, Asia, or North America faces serious challenges before it reaches a farmer in Nigeria, Kenya, or Ghana:
Transit time. International shipping typically takes 1–4 weeks. Spawn is a living organism. Every day in transit is a day the mycelium is aging without the ability to colonize properly. By the time imported spawn clears customs and reaches a buyer, a significant portion of its useful life may already be spent.
Temperature abuse. Spawn needs to be kept cool, ideally between 4°C and 15°C during transport and storage. Very few shipping routes through Africa maintain cold chain integrity consistently. A spawn that has been exposed to heat during transit may look normal but perform poorly.
Customs delays. Spawn sitting in a customs warehouse for an extended period without temperature control is spawn that is slowly aging or dying. This is a common experience among Nigerian mushroom farmers who have tried importing spawn.
The result: Many batches that fail after using imported spawn are not failing because of the farmer’s technique. They are failing because the spawn was already compromised before it arrived.
The better approach for African mushroom farmers: Source spawn locally from a supplier you can visit in person, whose production process you can verify, and whose spawn arrives fresh with a verifiable colonization date. Local spawn, when produced well, outperforms imported spawn on almost every metric for a farm in tropical conditions.
How Spawn Should Be Packaged and Stored

Whether you are buying spawn or making your own, packaging and storage determine how long it remains viable.
Packaging for spawn producers:
- Use breathable polypropylene bags with filter patches or small holes that allow gas exchange. Mycelium produces CO₂ and needs access to oxygen. Sealed airtight bags cause CO₂ buildup that stresses and eventually kills the mycelium.
- Smaller bags (500g–1kg) are easier to keep at the right temperature and easier to use.
- Label each bag with the strain name, colonization date, and production date.
Storage conditions:
- Ideal storage temperature: 4°C–15°C
- A domestic refrigerator set to its warmest setting works for small quantities
- In the absence of refrigeration, store in the coolest, most consistently cool space available, away from direct sunlight and heat
- Do not freeze spawn. Freezing kills the mycelium.
Shelf life:
- Stored at refrigerator temperature (4°C): 4–8 weeks
- Stored at room temperature in a tropical climate (25–30°C): 1–2 weeks maximum before significant performance decline
Best Grains for Making Spawn in Africa
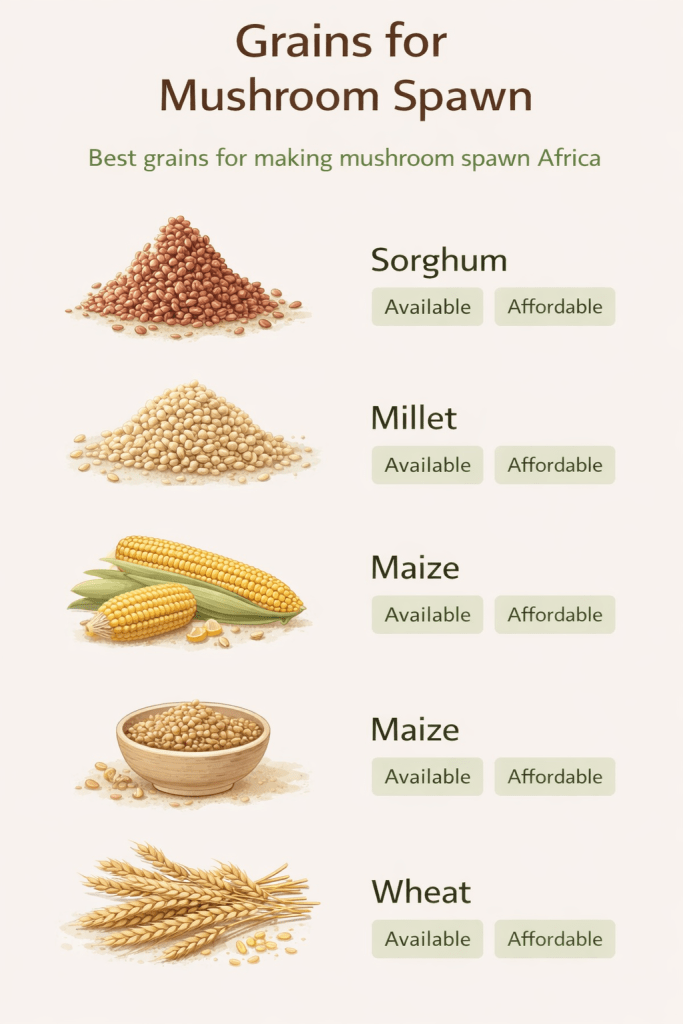
The original article recommended rye grain. Rye is excellent, but it is not readily available in most of Nigeria, Ghana, or East Africa. Here are the easier options:
Sorghum (guinea corn): The best all-round choice for West and East Africa. Widely available, affordable, holds its structure well during cooking and sterilization, and colonizes strongly. It is the most commonly used grain among experienced Nigerian mushroom spawn producers.
Millet: Works well, especially finger millet and pearl millet. Good nutrient profile for mycelium. Smaller grain size means more colonization points per bag, which speeds colonization. Can clump more than sorghum, adding gypsum during preparation prevents this.
Maize (corn): Available everywhere. Larger grain means fewer colonization points per bag than smaller grains. Tends to break down more easily if overcooked, which raises contamination risk. Requires precise cooking time, do not rush or extend it.
Wheat: Good structure and nutrient profile. More expensive than sorghum in most Nigerian markets but performs well and is widely used in East Africa where it is more affordable.
Avoid: Rice (breaks down too easily under sterilization), beans or legumes (wrong nutrient profile, high contamination risk), and processed or pre-milled grains.
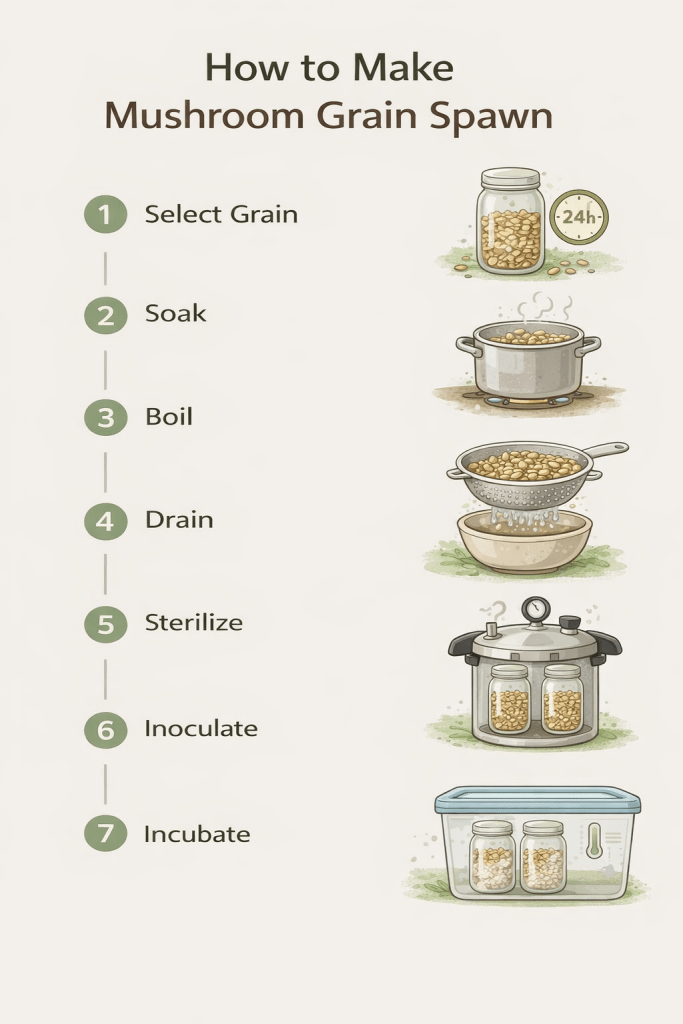
How to Make Mushroom Grain Spawn (Step-by-Step)
To make grain spawn, select clean grain (sorghum or millet works best in Africa), soak for 12–24 hours, boil until just cooked through but not burst open, drain and surface-dry, load into breathable bags or jars, sterilize at high pressure (121°C / 15 PSI) for 90–120 minutes, then inoculate with mushroom culture in a clean environment and incubate at 20–28°C until fully colonized.
Step 1: Select and Clean the Grain
Choose grain that is clean, free from visible mold, insects, or damage, and dry when you start.
Rinse the grain thoroughly in cold water, four to five rinses, until the water runs mostly clear. This removes surface dust and debris and reduces the surface microorganism load before soaking.
Step 2: Soak and Boil
Soak the rinsed grain in clean water for 12–24 hours. This allows even water absorption throughout the grain and causes dormant microorganism spores on the surface to activate, making them more susceptible to being destroyed during sterilization.
After soaking, drain and transfer to a large pot. Cover with fresh water and bring to a simmer, not a rolling boil. Cook for 10–15 minutes.
The test: Press a few grains between your fingers. They should yield with no hard dry core but hold their shape without mushing apart. Overcooked grain bursts open, releasing starch that bacteria feed on aggressively during incubation.
Optional additions during soaking:
Gypsum (calcium sulphate): 1–2% by weight of dry grain. Prevents grains from clumping together in the bag. Available at building materials stores.
Step 3: Drain and Dry
Drain immediately through a colander. Shake vigorously to release steam.
Spread the grain in a thin layer on a clean surface and allow it to surface-dry for 1–2 hours. You want the outside of each grain dry to the touch while the inside remains moist.
The test: Pick up a handful and squeeze. Grains should separate freely with no sticking or pooling water. This step is critical, wet grain loaded into bags creates excess steam during sterilization and dramatically raises contamination risk.
Step 4: Sterilize
Load the surface-dried grain into polypropylene bags with filter patches, filling to about two-thirds full. Do not pack tightly.
Cover jars with foil before placing in the pressure cooker to prevent water from the sterilizer entering and altering moisture content.
Sterilization requirements:
- Grain requires full sterilization not pasteurization
- Pressure cooker or autoclave at 121°C (15 PSI)
- 90–120 minutes for bags up to 1kg
- Larger bags need up to 2.5–3 hours
Do not rush this step. Under-sterilized grain is the most common cause of contamination in homemade spawn. For the distinction between pasteurization and sterilization and why it matters, read our Pasteurization guide.
Step 5: Inoculate
Allow sterilized bags or jars to cool completely to room temperature before inoculating. Hot grain kills your culture.
Inoculation means introducing your mushroom culture, liquid culture (LC) via syringe or a small amount of agar culture into the sterilized grain.
Work in the cleanest conditions possible:
- A still air box (SAB) a clear plastic container with arm holes cut in the sides significantly reduces airborne contamination during inoculation
- Alternatively, work in a still, enclosed room with no air movement, wiped down with isopropyl alcohol before you begin
- Wipe all injection points with isopropyl alcohol before use
- Work quickly and deliberately. Do not talk or cough over open containers.
Step 6: Incubate
After inoculation, move bags or jars to a clean, warm, dark space.
- Temperature: 20–28°C for most oyster mushroom strains
- Avoid temperature fluctuations, stable warmth produces fastest, most even colonization
- Keep in darkness
- Do not disturb bags during the first week
You will see white mycelium growth within 3–7 days if your culture is healthy and sterilization was complete. Once the mycelium has spread a few centimetres from the inoculation point, gently shake or rotate the bag to break up colonized grain and distribute growth points throughout the bag. This significantly speeds full colonization.
Full colonization of a 1kg grain spawn bag typically takes 14–21 days at the right temperature.
For more on what happens after your spawn is ready, substrate preparation, inoculation, incubation, fruiting, and harvest, read our Complete mushroom farming beginner guide.
Common Mistakes When Making Grain Spawn
- Too much moisture. Not surface-drying properly after cooking is the most common cause of contaminated homemade spawn. Test before loading.
- Insufficient sterilization. 60 minutes in a pressure cooker is not enough for grain. Use 90–120 minutes minimum at full pressure.
- Inoculating too soon. Hot grain kills your culture. Wait until completely at room temperature, usually overnight.
- Dirty environment during inoculation. A single contamination event at this stage can infect every bag you inoculate. Clean your space thoroughly.
- Overcooked grain. Burst grains release starch that feeds bacteria during incubation. Watch your cooking time.
- Skipping gypsum. Clumped, fused grain reduces colonization points and slows the process. A small amount of gypsum prevents this.
- Using old or weak culture. Your spawn is only as good as the culture you inoculate with. Use fresh, actively growing liquid or agar culture.
How to Store Grain Spawn Properly
Once fully colonized, use your spawn promptly or store correctly:
- Refrigerator (4°C–8°C): Spawn remains viable for 4–8 weeks
- Room temperature in tropical climate: Use within 1–2 weeks. The mycelium continues aging and begins producing mushrooms inside the bag if held too long.
- Do not freeze: Freezing kills mycelium
- Keep in breathable containers: Do not seal spawn bags completely airtight during storage
- Away from direct sunlight and heat
When to Use Your Spawn (Timing Matters)
Use spawn at peak colonization when mycelium has fully spread through the grain but has not yet begun to age.
Signs of peak colonization:
- Fully white throughout with no uncolonized grain visible
- Clean, fresh mushroom smell
- Grains separate when the bag is handled gently
- No yellowing, browning, or pins forming inside
Signs of over-aged spawn:
- Yellow or brown discolouration on the grain
- Visible mushroom pins forming inside the bag
- Strong, concentrated mushroom smell
- Grain beginning to break down
Over-aged spawn can still work but colonizes more slowly and produces lower yields. Always aim to use spawn at peak.
Frequently Asked Questions
Can I make grain spawn at home?
Yes, with the right equipment. You need a pressure cooker capable of reaching 15 PSI (121°C), polypropylene bags with filter patches or modified glass jars, a grain source (sorghum or millet), and a mushroom culture to inoculate with. A clean working environment during inoculation is just as important as the equipment. Many Nigerian mushroom farmers produce their own spawn at small scale successfully.
How long does grain spawn last?
Grain spawn stored in a refrigerator (4°C–8°C) lasts 4–8 weeks from the colonization date. At room temperature in a tropical climate, expect 1–2 weeks of viable shelf life. Use spawn before yellowing, strong smell, or pins forming inside the bag these are signs it has aged past its usable peak.
Which grain is best for spawn-making in Africa?
Sorghum (guinea corn) is the most practical and reliable grain for spawn production across Nigeria, Ghana, and most of West Africa. It is widely available, affordable, holds its structure well during cooking and sterilization, and colonizes strongly. Millet is an excellent alternative. Maize works but requires more precision during cooking.
Why is my spawn contaminated?
The five most common causes are: insufficient sterilization time or pressure, grain that was too wet when loaded into bags, inoculating in an unclean environment, using a contaminated culture, or damaged bags that allowed airborne contaminants to enter. Green contamination (Trichoderma) during incubation almost always traces back to one of these causes.
Conclusion
Making your own grain spawn gives you control over one of the most critical inputs in your mushroom farm and reduces your dependence on purchased spawn that may have been stored or transported poorly before it reached you.
The process requires precision at two points: sterilization must be thorough, and inoculation must be clean. Get those two steps right and your homemade spawn will outperform most of what you can buy locally.
Start with sorghum or millet. Use a pressure cooker. Surface-dry your grain carefully before loading. Work clean during inoculation. Store your spawn cool. Use it at peak colonization.
For the full context of how grain spawn fits into your mushroom farming operation from substrate preparation through to your first sale see our Complete mushroom farming guide for beginners

Leave a comment