Table of Contents
- What is the BRF Tek method and why is it perfect for beginners
- Which edible mushrooms grow well with this method
- What you need before you start
- The substrate formula
- Step 1 — Prepare and fill your jars
- Step 2 — Sterilize the jars
- Step 3 — Inoculate with spore or liquid culture
- Step 4 — Incubation
- Step 5 — Dunk and roll
- Step 6 — Fruiting
- Step 7 — Harvest and subsequent flushes
- Contamination: how to spot it and what to do
- Common mistakes and how to avoid them
- Key takeaways
- FAQ
Introduction
The Brown Rice Flour Tek method — commonly called BRF Tek or PF Tek — is the most beginner-friendly way to grow edible mushrooms at home or on a small farm. It requires no expensive laboratory equipment, uses three simple, affordable ingredients, and can produce your first harvest of fresh gourmet mushrooms within 4 to 6 weeks of starting.
This guide covers the complete BRF Tek process for growing edible mushrooms — specifically oyster mushrooms (Pleurotus ostreatus), shiitake (Lentinula edodes), and lion’s mane (Hericium erinaceus) — from substrate preparation to harvest, in plain language that any beginner can follow.
Important note: This guide covers the cultivation of edible mushroom species only. Always verify the legal status of any mushroom species you intend to cultivate in your country before starting.
1. What Is the BRF Tek Method and Why Is It Perfect for Beginners
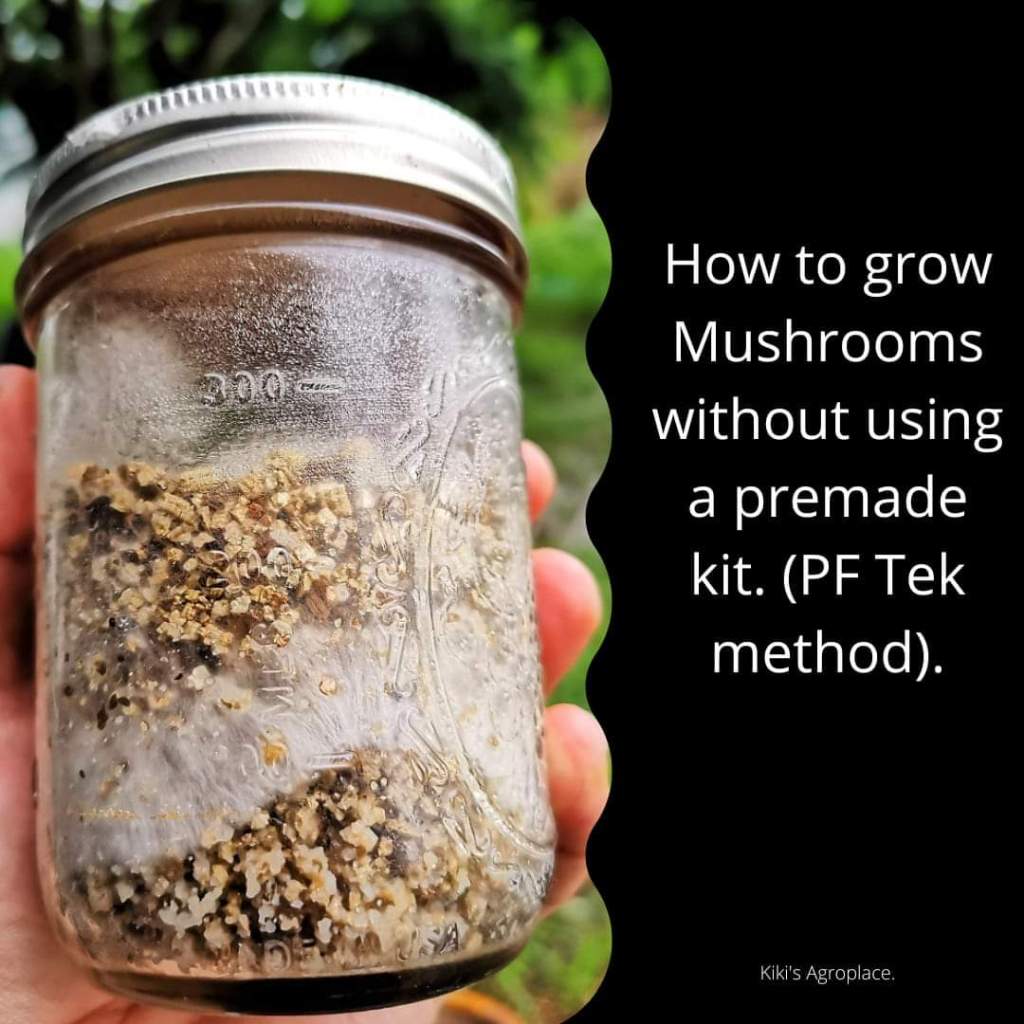
BRF Tek is a cultivation method that uses a simple substrate — a mix of brown rice flour, vermiculite, and water — packed into sterilized glass jars. Once sterilized and cooled, the jars are inoculated with mushroom spores or liquid culture. The mushroom mycelium (the root-like network of the mushroom) colonizes the substrate inside the jar over 2 to 3 weeks, producing a solid block of colonized substrate called a cake. The cake is then removed from the jar and placed in a fruiting chamber where mushrooms grow and can be harvested.
Here is why this method is so effective for beginners:
- Simple, affordable ingredients. Brown rice flour, vermiculite, and water are inexpensive and available in most countries. No specialised substrate preparation equipment is needed.
- Small scale. You can start with 6 to 12 half-pint jars and produce a meaningful harvest from a small space; a kitchen shelf, a spare room, or a simple grow tent.
- Sterilization without a pressure cooker. Unlike grain-based substrates that require pressure cooking, BRF Tek jars can be sterilized by simple steam heating in a regular pot with a lid — making it genuinely accessible to beginners without specialized equipment.
- Visible progress. Watching the white mycelium spread through the jar over 2 to 3 weeks is both educational and satisfying. You can see exactly what is happening at every stage.
- Replicable results. The same formula and steps produce consistent results across multiple jars and multiple grows, giving you a reliable foundation to build on.
2. Which Edible Mushrooms Grow Well With This Method
Not all edible mushrooms are suited to BRF Tek. The best species for this method are those that colonise brown rice flour substrate reliably and produce well from cakes in a humid fruiting environment.
| Species | Common Name | Time to First Harvest | Notes |
|---|---|---|---|
| Pleurotus ostreatus | Oyster mushroom | 4 to 5 weeks from inoculation | Fast coloniser. Add sawdust to the BRF mix for better yields. Needs high fresh air exchange during fruiting. |
| Lentinula edodes | Shiitake | 5 to 6 weeks from inoculation | Slower coloniser. Fruiting is triggered by temperature drop and fresh air increase. |
| Hericium erinaceus | Lion’s mane | 5 to 6 weeks from inoculation | Grows well on BRF cakes in warm, humid conditions. Produces distinctive white, pom-pom shaped fruiting bodies. |
| Trametes versicolor | Turkey tail | 6 to 8 weeks from inoculation | Medicinal mushroom. Slower growth but worth growing for its health benefits and market value. |
For oyster mushrooms specifically: Add sawdust to your BRF substrate mix at a ratio of 1 part sawdust to 1 part brown rice flour. Sawdust is the natural preferred substrate for oyster mushrooms and improves both colonisation speed and yield significantly compared to BRF alone.
3. What You Need Before You Start
Equipment:
- Half-pint (250 ml) wide-mouth glass canning jars; wide-mouth jars make it easier to remove the colonised cake at harvest. You need at least 6 jars to make a productive first grow.
- A large pot with a lid; for steam sterilization. Must be tall enough to hold your jars with the lid on.
- A small rack, folded cloth, or jar rings; to raise jars off the direct heat of the pot bottom during sterilization
- Aluminium foil — to cover jar lids during sterilisation
- A hammer and a 3 mm (1/8 inch) nail — to punch inoculation holes in the jar lids
- Masking tape — to cover inoculation holes before and after use
- A spore or liquid culture syringe — to inoculate your jars. Source from a reputable, verified supplier of edible mushroom cultures.
- 70% isopropyl alcohol — for sterilizing your workspace and equipment during inoculation
- A still air box or glove box — a clear storage bin with arm holes cut in the side. This creates a low-turbulence, low-contamination environment for inoculation without a sterile laboratory.
- A fruiting chamber — a clear plastic storage bin or grow tent with proper humidity and fresh air management
- A spray bottle — for misting the fruiting chamber
- A thermometer and hygrometer (humidity meter) — to monitor growing conditions
Substrate ingredients (per 6 jars):
- 3 cups (approximately 290g) vermiculite — a natural mineral that holds moisture and provides the structure of the substrate
- 1.5 cups (approximately 270g) brown rice flour — the nutritional base for mycelium growth
- 1.5 cups (approximately 355 ml) clean water — use tap water that has been boiled and cooled, or filtered water
For oyster mushroom cakes (modified formula): Replace half the brown rice flour with hardwood sawdust for significantly better results.
4. The Substrate Formula
The standard BRF Tek formula per half-pint jar is:
- Half cup (approximately 48g) vermiculite
- Quarter cup (approximately 45g) brown rice flour
- Quarter cup (approximately 60 ml) water
The substrate should be moist but not wet. To test this, squeeze a small handful firmly in your fist. A few drops of water should appear, but the substrate should not pour water freely. This is called field capacity — the ideal moisture level for mushroom substrate. Too wet and the substrate will be anaerobic and prone to bacterial contamination. Too dry and colonization will be slow or incomplete.
5. Step 1 — Prepare and Fill Your Jars
- Using your hammer and nail, punch 4 holes through each jar lid, equally spaced around the circumference. These will be your inoculation ports. Place the lids on a clean surface, bottom side up, and punch from the inside out so the raised edges face upward; this helps guide the syringe needle in later.
- Mix your substrate. In a clean bowl, combine the vermiculite and water first, mixing until all the vermiculite is evenly moistened. Then add the brown rice flour and mix thoroughly until well combined.
- Fill each jar with the substrate mix up to the lowest ring of the jar neck; do not fill to the top. Leave a gap of approximately 1.5 cm (half an inch) at the top.
- Wipe the inside of the jar rim and the top surface of the substrate with a clean, dry paper towel.
- Add a layer of dry vermiculite approximately 1 cm thick on top of the substrate. This dry layer acts as a contamination barrier between the inoculation holes and the substrate below.
- Place the lids on the jars and tighten the ring bands firmly.
- Cover each inoculation hole with a small piece of masking tape. Fold one edge over to create a small tab; this makes the tape easy to pull off during inoculation without touching the hole directly.
- Cover each jar completely with a square of aluminium foil, wrapping it tightly around the lid and neck of the jar. This protects the inoculation holes from water during sterilisation.
6. Step 2 — Sterilize the Jars
Sterilization kills any bacteria, molds, and competing fungi present in the substrate. Skipping or shortcutting this step is the most common cause of contaminated grows.
- Add approximately 5 cm (2 inches) of water to your large pot.
- Place your rack or folded cloth on the bottom of the pot to raise the jars off the direct heat.
- Arrange the jars on the rack. Do not let them touch the direct bottom of the pot.
- Put the lid on the pot and bring the water to a boil.
- Once boiling, reduce heat to maintain a steady steam and steam the jars for 60 to 90 minutes. Do not lift the lid during sterilization.
- After sterilization, turn off the heat and allow the jars to cool completely inside the pot with the lid on. This typically takes 4 to 8 hours. Do not inoculate warm jars — heat kills spores and liquid culture. Jars must be fully at room temperature before inoculation.
Note on pressure cookers: If you have access to a pressure cooker, sterilize at 15 psi for 45 minutes. Pressure cooking provides more reliable sterilization than steam alone, especially for thicker substrate mixes or modified recipes that include sawdust.
7. Step 3 — Inoculate With Spore or Liquid Culture
Inoculation means introducing the mushroom spores or mycelium culture into the sterilized substrate. This step requires the cleanest environment and the most careful handling of the entire process. Any contamination introduced at this stage will colonise alongside or instead of your mushroom mycelium.
Prepare your still air box or glove box:
- Wipe the inside of the box thoroughly with 70% isopropyl alcohol.
- Allow the alcohol to dry and the air inside the box to settle for 5 to 10 minutes before beginning.
- Place your syringe, alcohol swabs, and the jars inside the box.
Inoculation procedure:
- Shake your spore or liquid culture syringe vigorously for 30 seconds to evenly distribute the spores or mycelium throughout the liquid.
- Using a lighter or alcohol lamp, heat the needle of the syringe until it glows red-hot. Allow it to cool for 10 to 15 seconds, then wipe it clean with a fresh alcohol swab. Do this before inoculating each jar.
- Remove the masking tape tab from one inoculation hole.
- Insert the sterilized needle into the hole at a slight angle so it rests against the inner wall of the jar; this allows the culture to run down the glass wall and into the substrate rather than pooling on the dry vermiculite layer.
- Inject approximately 0.25 ml (a quarter cc) of culture per hole. For a jar with 4 holes, you will use approximately 1 ml of culture total per jar.
- Cover the hole immediately with a fresh piece of masking tape after each injection.
- Repeat for all jars, sterilizing the needle between each jar.
Once all jars are inoculated, move them to your incubation space immediately.
8. Step 4 — Incubation
During incubation, the mushroom mycelium grows through the substrate inside each jar. This is the waiting phase; your main job is maintaining the right environment and watching for contamination.
Incubation conditions:
- Temperature: 24°C to 29°C (75°F to 85°F) for most edible species. Lion’s mane and shiitake prefer the lower end of this range.
- Light: Dark or low light; mycelium does not need light to grow and does not benefit from it during incubation
- Humidity: Not critical at this stage because the substrate is inside sealed jars
- Disturbance: Minimal; leave the jars undisturbed except for daily visual inspection
What to expect during incubation:
- Days 3 to 7: You should see the first signs of white, fluffy mycelium growth beginning at the inoculation points where the culture entered the jar.
- Days 7 to 14: White mycelium continues to spread through the substrate. A fully healthy mycelium is bright white and has a clean, earthy smell.
- Days 14 to 21: Most jars should be fully colonised by week 3. Fully colonised substrate appears completely white throughout. Oyster mushrooms colonise faster than shiitake or lion’s mane.
Contamination check: Inspect every jar daily. Any colour other than white; green, black, pink, orange, or yellow patches, indicates contamination. Remove contaminated jars from your incubation area immediately. Take them outside before opening; never open contaminated jars indoors, as spores from contaminants will spread to your clean jars.
Once a jar is fully colonised with no signs of contamination, leave it for an additional 3 to 7 days to allow the mycelium to consolidate and strengthen before moving to the next step. This is called consolidation and improves your final yields.
9. Step 5 — Dunk and Roll
Before fruiting, you rehydrate the colonised cake through a process called dunking. Colonisation depletes the moisture in the substrate, and rehydrating before fruiting significantly improves your first flush yield.
- With clean hands, carefully remove the colonised cake from the jar by unscrewing the lid and turning the jar upside down. Tap the bottom gently until the cake slides out as a single solid block. If it sticks, run a clean knife around the inner edge of the jar.
- Place the cake in a clean container of cold water. Weigh it down with a clean plate or bowl so it stays submerged.
- Soak the cake in the refrigerator for 12 to 24 hours. The cold temperature and rehydration prepare the cake for fruiting.
- Rolling (optional but recommended): After dunking, roll the wet cake in dry vermiculite to coat the outer surface. The vermiculite coating helps retain moisture during fruiting and can improve yields.
10. Step 6 — Fruiting
After dunking and rolling, move the cakes to your fruiting chamber. This is where your mushrooms will actually grow and be harvested.
Setting up the fruiting chamber:
A simple fruiting chamber can be made from a clear plastic storage bin (54 litres or larger). Drill holes around the sides and top, approximately 5 cm apart, and stuff them with polyfill (synthetic fibre fill) or micropore tape. This provides fresh air exchange (FAE) while maintaining humidity.
Place each cake on a small square of aluminium foil or a shot glass inside the chamber; this raises it slightly off the floor and allows airflow beneath the cake.
Fruiting conditions:
- Temperature: 18°C to 24°C (65°F to 75°F) — slightly cooler than incubation temperature triggers fruiting in most species
- Humidity: 85% to 95%. Mist the walls and floor of the chamber (not the cakes directly) 2 to 4 times per day to maintain this level. A hygrometer inside the chamber helps you monitor this accurately.
- Fresh air exchange: Fan the chamber briefly 2 to 3 times per day by removing the lid and replacing it quickly. CO₂ builds up inside the chamber and inhibits fruiting. Oyster mushrooms in particular need high fresh air exchange; insufficient FAE causes long, thin stems and small caps.
- Light: Indirect light for 6 to 12 hours per day. Mushrooms use light as a directional cue; they grow toward the light source. A window with indirect light or a simple LED is sufficient.
What to expect after placing cakes in the fruiting chamber:
- Days 1 to 3: The cake surface may look slightly wet or begin to show tiny white bumps. These are the first signs of pin formation.
- Days 3 to 7: Pins develop into small mushroom fruiting bodies. Growth at this stage is rapid; check your chamber twice daily.
- Days 7 to 14: Mushrooms reach harvest size. Harvest before the veil under the caps begins to tear. Once the veil breaks, the mushroom releases its spores; which makes a mess of your chamber and can reduce the quality of subsequent flushes.
11. Step 7 — Harvest and Subsequent Flushes
How to harvest:
Twist and pull each mushroom gently from the base rather than cutting. Leaving stubs behind creates entry points for contamination. After harvesting, remove any small aborted pins left on the cake surface as these will rot and create contamination risk.
Subsequent flushes:
After your first harvest, dunk the cake again in cold water for 12 to 24 hours and return it to the fruiting chamber. This rehydrates the cake for the next flush. A healthy, well-managed BRF Tek cake typically produces 2 to 4 flushes before the substrate nutrients are depleted. Each flush tends to be slightly smaller than the previous one as the available nutrients decrease.
Harvest timing by species:
- Oyster mushrooms: Harvest when the caps are fully open but before the edges begin to curl upward. At room temperature they grow quickly; check twice daily near harvest time.
- Shiitake: Harvest when the veil underneath the cap is still intact but starting to stretch. The cap should be 50% to 70% open.
- Lion’s mane: Harvest when the fruiting body is firm and white. Once it begins to turn yellow, it has been left too long.
Spent substrate: After 3 to 4 flushes, the cake is depleted. Do not discard it; spent BRF Tek substrate is nutrient-rich and makes an excellent soil amendment for gardens or a roughage supplement for livestock. Read our guide on how to use mushrooms in livestock feed (coming soon) for more on this.
12. Contamination — How to Spot It and What to Do
Contamination is the most common challenge in BRF Tek cultivation. Understanding what you are looking at when something goes wrong is essential.
| What You See | What It Means | What to Do |
|---|---|---|
| Green patches (Trichoderma) | The most common fungal contaminant. Fast-spreading and destructive. | Remove the jar or cake immediately. Take it outside before opening. Dispose of the contents away from your grow area. |
| Black or dark patches | Aspergillus or other mould. Can be dangerous if inhaled. | Remove immediately. Never open indoors. Improve sterilisation and inoculation hygiene for the next grow. |
| Pink, red, or orange patches | Bacterial contamination (wet rot). Usually caused by insufficient sterilisation or substrate that was too wet. | Remove immediately. Reassess your substrate moisture and sterilisation time. |
| Yellow liquid pooling in the jar | Metabolite secretion from stressed mycelium. Often caused by temperature fluctuation or contamination. | Monitor closely. If a foul smell develops, remove the jar. If the smell is normal and earthy, the mycelium may recover. |
| White or blue tinges at harvest point | Bruising — normal in many edible species, caused by physical contact | No action needed. Bruising does not affect edibility. |
The most effective contamination prevention measures:
- Always allow jars to cool completely before inoculating
- Flame sterilize the needle between every jar and every hole
- Work inside your still air box during inoculation; never inoculate in an open room
- Never inoculate substrate that looks or smells unusual after sterilisation
- Inspect jars daily and remove contaminated ones the moment you spot a problem
13. Common Mistakes and How to Avoid Them
- Inoculating before jars are fully cool. Heat kills spores and culture. Always wait until jars are fully at room temperature; this can take 4 to 8 hours after sterilization. When in doubt, wait longer.
- Substrate too wet. Wet substrate is anaerobic and promotes bacterial contamination rather than mycelium growth. Always test your substrate to field capacity before filling jars.
- Skipping the dry vermiculite layer. This protective top layer acts as a contamination barrier. Do not skip it to save time.
- Opening contaminated jars indoors. The spores of contaminants like Trichoderma spread rapidly and will infect your other jars. Always take contaminated jars outside before opening.
- Too much or too little fresh air exchange during fruiting. Too little FAE produces long, thin stems and small caps. Too much reduces humidity below fruiting thresholds. Balance is key; fan 2 to 3 times daily and monitor your hygrometer.
- Spraying water directly onto cakes or mushrooms. This causes bacterial blotch and damages developing mushrooms. Mist the walls and floor of the chamber, not the cakes.
- Harvesting too late. Once the veil under the cap tears, mushrooms release spores, decline in quality, and reduce subsequent flush yields. Harvest just before the veil breaks.
14. Key Takeaways
- BRF Tek is the most accessible mushroom cultivation method for beginners — it requires no laboratory equipment and uses three simple, affordable ingredients.
- The best edible species for this method are oyster mushrooms, shiitake, lion’s mane, and turkey tail. Add sawdust to the substrate for oyster mushrooms.
- Sterilization and inoculation hygiene are the two most critical steps. Most failed grows are caused by contamination introduced at one of these two stages.
- Always allow jars to cool completely before inoculating. Heat kills your culture.
- Dunk your cakes for 12 to 24 hours in cold water before fruiting and between flushes; this rehydration step significantly improves yields.
- A healthy BRF Tek cake produces 2 to 4 flushes. Spent cakes are valuable as soil amendments or livestock feed supplements.
Ready to move beyond BRF Tek to larger-scale production? Read our complete guide on how to start oyster mushroom farming in Africa.
👉 Learn how to sell your mushrooms profitably in our guide on how to sell mushrooms to restaurants and hotels in Nigeria. (Coming soon)
👉 Discover how to add value to your mushroom harvest in our guide on how to add value to your farm products and earn more per kilo. (Coming soon)
15. FAQ
What does BRF Tek stand for?
BRF Tek stands for Brown Rice Flour Technique. It is a beginner-friendly mushroom cultivation method that uses a substrate made from brown rice flour, vermiculite, and water packed into sterilized glass jars. The method is also sometimes called PF Tek. This guide covers its use exclusively for growing edible mushroom species.
Do I need a pressure cooker to use this method?
No. One of the key advantages of BRF Tek over grain-based cultivation methods is that BRF substrate can be sterilized using steam from a regular pot on a stovetop. Steam the jars for 60 to 90 minutes. However, a pressure cooker at 15 psi for 45 minutes provides more reliable sterilization, particularly for modified recipes that include sawdust.
How long does it take to get a harvest using BRF Tek?
From inoculation to first harvest typically takes 4 to 6 weeks depending on the species. Oyster mushrooms are the fastest; approximately 4 to 5 weeks. Shiitake and lion’s mane take 5 to 6 weeks. After the first harvest, subsequent flushes follow every 1 to 2 weeks with dunking between each.
Why is my my mushroom bag turning green?
Green growth is Trichoderma; the most common fungal contaminant in mushroom cultivation. It is not your mushroom mycelium. Remove the affected jar or cake immediately, take it outside, and dispose of the contents away from your growing area. Review your sterilization and inoculation hygiene for your next grow; Trichoderma contamination most commonly enters through insufficient sterilization time, inoculating before jars are fully cool, or a contaminated workspace during inoculation.
How many flushes can I get from one BRF Tek cake?
A well-managed BRF Tek cake typically produces 2 to 4 flushes of mushrooms before the substrate nutrients are depleted. Between each flush, dunk the cake in cold water for 12 to 24 hours to rehydrate it before returning it to the fruiting chamber. Each subsequent flush is generally smaller than the previous one as the available nutrients decrease.
Can I use this method for commercial mushroom production?
BRF Tek is best suited for home growing, learning the fundamentals of mushroom cultivation, and small-scale production. For commercial production, most mushroom farmers transition to bulk substrate methods using straw, sawdust, or supplemented hardwood blocks, which produce significantly higher yields per unit of space and labour. BRF Tek is an excellent starting point that teaches you the essential skills you need before scaling up to commercial methods.
Where do I get spore or liquid culture syringes for edible mushrooms?
Source your spore or liquid culture syringes from reputable, verified mushroom cultivation suppliers. In Nigeria, check with established mushroom farming networks and agricultural input suppliers in major cities. Internationally, many legitimate online suppliers stock culture syringes for oyster, shiitake, lion’s mane, and other edible species. Always verify the supplier’s reputation before purchasing; poor-quality or contaminated cultures are a common source of failed grows.
Published by Kiki’s Agroplace — Digital Marketing for African Agribusinesses.

Leave a comment