Mushroom spawn is the most important input in your mushroom farm. Before any substrate is prepared, before any bag is packed, before any fruiting begins, it all starts with spawn.
If your spawn is good, your mushrooms have a strong start. If your spawn is bad, nothing you do afterwards will fix it. Bad spawn means failed batches, wasted substrate, and lost income.
The good news is that identifying good spawn from bad is not complicated. You use three things: your eyes, your nose, and your hands. This guide teaches you exactly what to look for.
What Is Mushroom Spawn?
Mushroom spawn is the “seed” used to grow mushrooms.
It is usually made from grain; like sorghum, millet, or wheat, that has been prepared and then colonized by mushroom mycelium.
Mycelium is the white, thread-like growth that is the living body of the mushroom. Think of it like roots. When mycelium grows through grain, that grain becomes spawn. When you mix spawn into your substrate (the material mushrooms grow on, like straw or sawdust), the mycelium spreads and eventually produces mushrooms.
Spawn is alive. And like any living thing, it can be healthy or not.
To understand how spawn fits into the full growing process, read our Mushroom lifecycle guide it explains what mycelium does at every stage from spawn to harvest.
How Can You Tell If Mushroom Spawn Is Good?
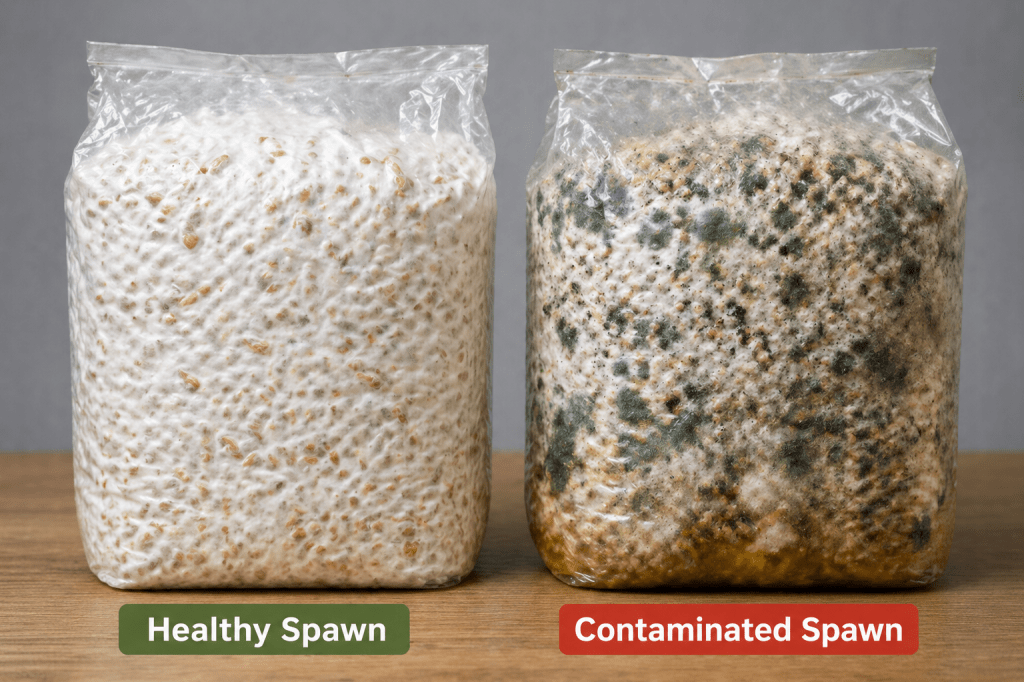
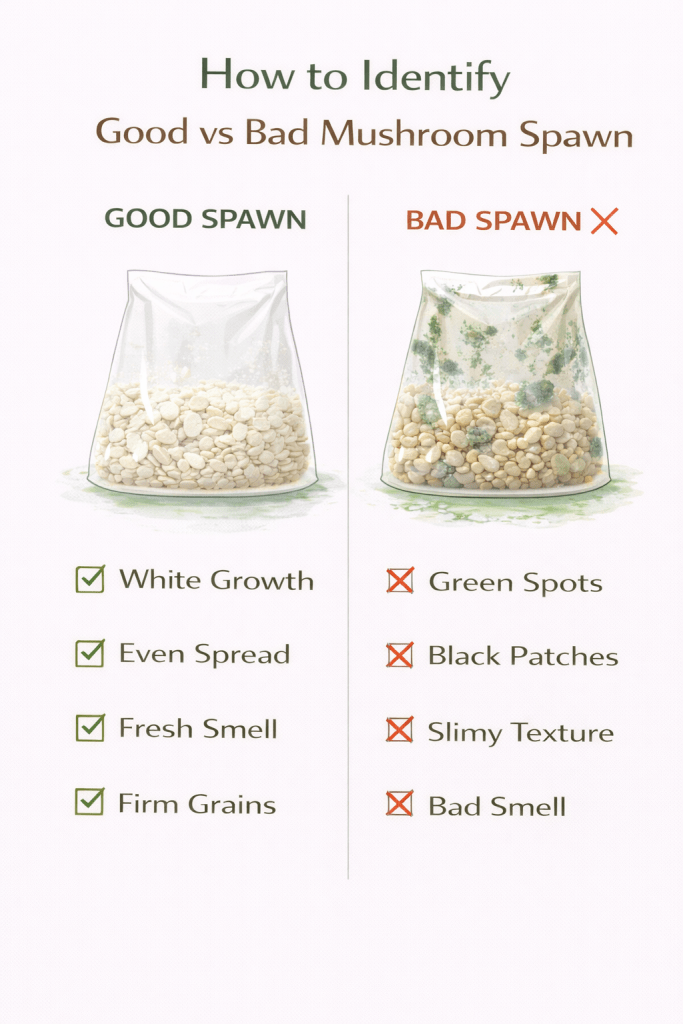
Good mushroom spawn is bright white throughout, with even mycelium growth covering all the grains in the bag. It smells clean and mildly earthy like fresh mushrooms or damp soil. The grains feel firm and separate easily when the bag is gently handled. There are no green, black, yellow, or pink patches anywhere inside the bag.
What Good Mushroom Spawn Looks Like
When you hold up a bag of grain spawn and look at it carefully, here is what you want to see:
Signs of Good Mushroom Spawn
Bright, even white colour. The inside of the bag should be white; a clean, bright white. This is the mycelium covering the grain. Good spawn has white growth spread evenly from top to bottom. Not just in one corner. Not just on the surface. All the way through.
Even coverage across all grains. Hold the bag up to the light. The white growth should look consistent throughout. No patches of bare grain showing through. No thick white clumps on one side and nothing on the other.
No other colours. White only. No green. No black. No yellow. No pink. No orange. No grey. White is the only colour you want inside a healthy spawn bag.
Grains that move. When you gently squeeze or shake the bag, the grains should shift and separate. They should not be fused into one hard, solid block. If the grains still separate with a gentle shake, the spawn is in good condition.
The bag is not bloated. A slightly soft bag with a filter patch is normal; the filter allows the mycelium to breathe. A bag that is extremely puffed up or inflated may indicate bacterial activity inside.
What Bad Mushroom Spawn Looks Like
Signs of Bad or Contaminated Spawn
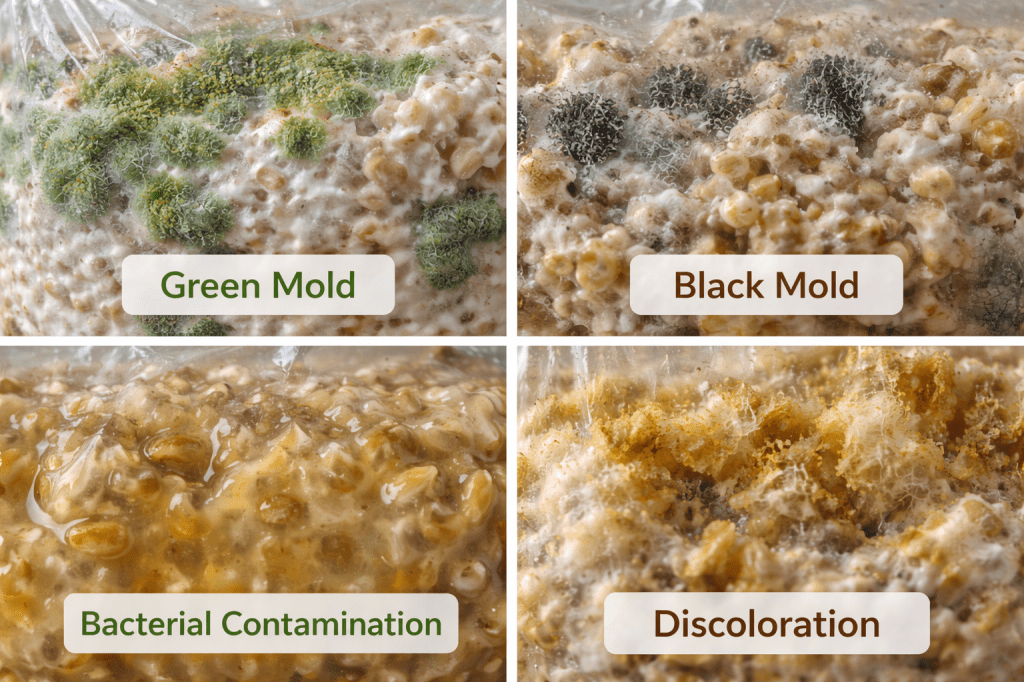
Green patches. Green is the most common contamination colour in mushroom spawn. It usually means Trichoderma – a fast-growing mold that competes aggressively with mushroom mycelium. Even one small green patch means the entire bag is compromised. Do not use it.
Black spots. Black discolouration can mean mold or bacterial contamination. Any black area is a warning sign.
Yellow or brown patches. Yellow or brown colouring on the grain can mean bacteria, or it can mean the spawn has aged past its usable peak. Either way, it will perform poorly.
Pink or orange growth. These colours indicate contamination from specific competing organisms. Any non-white colour is a reason to reject the bag.
Grains fused into a hard block. If the entire bag has compressed into one solid mass that will not break apart when you gently handle it, the spawn has over-aged. It may look mostly white, but the mycelium has grown past its peak.
Slimy or wet-looking grain. If you open the bag and the grain looks wet and slimy not just slightly moist, bacteria have likely taken over. This spawn will contaminate your substrate the moment you mix it in.
Smell Test (Very Important)
Smell is one of the most reliable ways to check spawn quality and most beginners skip it entirely.
Good spawn smells:
- Clean and mild
- Slightly earthy, like damp soil after rain
- Faintly mushroom-like; a light, fresh scent
That is all. The smell should be gentle and pleasant.
Bad spawn smells:
- Sour – like something fermenting or going off
- Rotten or putrid
- Sharp and stinging, like ammonia
- Strongly alcoholic
Trust your nose. If the smell makes you pull back even slightly, do not use that spawn.
A sour smell almost always means bacterial contamination. An ammonia smell usually means the grain fermented before or during sterilization. A rotten smell means something is seriously wrong.
The smell test takes three seconds and can save you an entire batch.
Texture and Moisture Check
After the visual and smell checks, do a quick texture check.
Open the bag slightly and take a small pinch of spawn between your fingers.
Good spawn feels:
- Firm – the grain holds its shape
- Slightly moist inside, not wet or bone dry
- Faintly fluffy where the mycelium covers the grain surface
Bad spawn feels:
- Slimy or slippery; bacteria
- Completely dry and crumbling; the mycelium may have died from heat damage or drying out during storage
- Mushy and soft; grain has broken down from too much moisture or overcooking during preparation
A simple way to picture it: healthy spawn feels roughly like slightly damp cooked grain that holds its shape. If it feels very different from that; too wet, too dry, or slimy, do not use it.
Growth Pattern Check
If you are watching spawn during its colonization period (the time after inoculation when mycelium spreads through the grain), the growth pattern tells you a lot.
Good spawn growth pattern:
- Visible white growth starts within 3–7 days of inoculation
- Spreads steadily and evenly outward from the inoculation point
- Covers the full bag within 14–21 days at the right temperature
- Growth looks thick and consistent; not thin and wispy
Bad spawn growth pattern:
- No visible growth after 10 days; spawn may have been dead on arrival or the environment was not clean
- Growth starts but stalls before filling the bag; weak or old culture
- Patchy white growth mixed with any other colour; contamination competing with the mycelium
- Very thin, slow, or uneven growth throughout
Why Some Spawn Fails Even If It Looks Okay
Sometimes spawn looks white and clean, passes the smell test, and still produces a weak or failed batch. Here are the most common reasons:
Old spawn. Spawn has a shelf life. At room temperature in a tropical climate, grain spawn stays at its best for about 1–2 weeks after full colonization. In a refrigerator, it lasts 4–8 weeks. Spawn that has been sitting too long still looks white, but the mycelium has lost its energy. It colonizes your substrate slowly, giving competing organisms time to take hold.
Heat damage. Spawn exposed to high temperatures during transport or storage can look completely normal but perform poorly. The mycelium is damaged in a way you cannot see visually. This is a major cause of poor spawn performance for farmers in hot climates receiving spawn through unrefrigerated transport.
Poor storage after purchase. If you buy spawn and leave it in a hot room or in sunlight for several days before use, even good spawn deteriorates. Store spawn in the coolest available spot and use it as soon as you reasonably can.
Why Imported Spawn Often Has Problems (African Context)
If you have tried imported spawn and had unexpected failures, the quality at the point of arrival is frequently the cause.
Here is why:
Long travel time. International shipping to most of West and East Africa takes 2–4 weeks. Spawn is alive and aging every day in transit. By the time it clears customs and reaches you, significant shelf life has been consumed.
High temperatures in transit. Cargo shipping is not temperature-controlled. Spawn sitting in a ship’s hold or a customs warehouse at 35°C for several weeks will be compromised regardless of its original quality.
No cold chain. Cold chain means keeping temperature consistently controlled from producer to buyer. This is very difficult to guarantee across long international routes, especially the last leg of delivery in Africa.
The practical conclusion: For most farmers in Nigeria, Ghana, Kenya, and across Africa, locally produced spawn; bought from a supplier you can visit in person with a known colonization date, will almost always arrive in better condition than imported spawn. For how to make your own grain spawn and reduce dependence on external suppliers, read our Complete guide on how to make grain spawn.
What to Do If You See Bad Spawn
Do not use it. Even if you have already paid for it. Using contaminated spawn will almost certainly cost you more in lost substrate, wasted bags, and failed batches than what the spawn originally cost.
Keep it away from clean materials immediately. Do not open a contaminated spawn bag near your clean substrate, clean bags, or your grow room. Mold spores release into the air when the bag is disturbed.
Seal the bag and remove it from the farm area. Place it inside a second bag before moving it. Dispose of it away from your growing space.
Contact your supplier. Tell them what the batch looked like, when you received it, and what the contamination looked like. A good supplier wants this feedback and should replace the batch or explain what went wrong.
Quick Checklist Before You Use Spawn
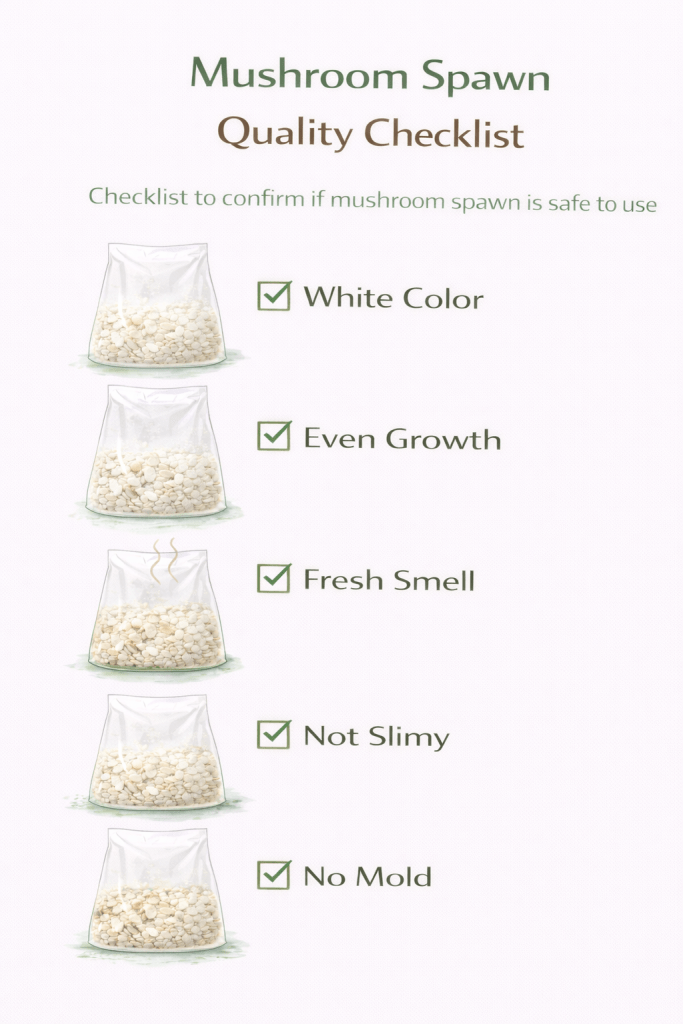
Run through this every time before mixing spawn into substrate:
- Is it white throughout – no other colours anywhere in the bag?
- Does it smell clean and mild – no sourness, ammonia, or rot?
- Do the grains separate when you gently handle the bag – not fused solid?
- Does the grain feel firm and slightly moist – not slimy, not bone dry?
- Do you know approximately when it was made and how it was stored?
All five passed? Your spawn is ready.
Common Mistakes When Checking Spawn
Trusting the label only. A label saying “premium quality spawn” tells you nothing about what is actually inside the bag. Always check the spawn itself; visually, by smell, and by touch.
Ignoring the smell. Many beginners only look at the colour. Spawn that looks mostly white can still smell sour, which means bacterial contamination is present before any visible colour change has appeared. Always smell the spawn.
Using “slightly bad” spawn and hoping it will be fine. A small contaminated patch will spread. When that spawn is mixed into your substrate, the contamination has access to the entire bag. There is no such thing as spawn that is “slightly contaminated but probably fine.” If it fails the checks, do not use it.
Not checking the age. Spawn made six weeks ago and stored at room temperature in a hot climate may look perfectly white but be well past its effective life. Ask your supplier for the colonization date, not just the delivery date.
Conclusion
Checking spawn quality is a two-minute skill that protects every batch you grow. Most failures that beginners blame on technique, humidity, or substrate quality actually started with spawn that should not have been used.
White. Clean-smelling. Firm-grained. Evenly grown. No other colours. Those are your five standards – check them every single time.
For the next steps in the growing process, read our Guide to pasteurizing mushroom substrates the step that prepares your substrate to receive the spawn correctly. And for the complete growing journey from start to harvest, our Mushroom Farming complete beginner guide walks through every stage in the same simple language.

Leave a comment